Showing posts with label Make-It Monday. Show all posts

Monday, November 26, 2012

Make-It Monday: Child's Reversible Apron

Since 2010, I've featured "Make It Monday" on my blog during the holiday season. On the Mondays between Thanksgiving and Christmas, I share different ideas and instructions on how to make homemade (or partially homemade) gifts. My life is crazy right now, but I'm going to do my best to keep up the tradition. Stop by each week for a new homemade gift idea!


Today, I'm going to show you how to make an easy reversible apron for a child. I've got quite a dedicated little sous-chef here at my house. She loves using this little apron...and she looks pretty darn cute in it too. This is an inexpensive gift and a great way to use up small amounts of fabric that you might have around the house.

How to Make a Child's Reversible Apron

Supplies:
  • measuring tape
  • tissue paper to make pattern
  • pencil
  • two different fabrics (I used one print, one solid)
  • scissors
  • straight pins
  • thread
  • sewing machine
  • masking tape
  • safety pin
  • ribbon or double-wide bias tape (stitched closed)

Directions:

Make the Pattern:
To make your pattern, you'll need the child's measurements -- the width across the front of the chest, the length of the top of the apron to the armpit, and the length you want the apron to be, and the width of the apron (usually the width of the front of the child plus a couple of inches).

Cut a rectangle out a piece of tissue paper that is as long as you want the apron to be and as wide as you want the apron to be. My rectangle started out as 18 x 15. Fold in half lengthwise so you get a skinny rectangle (18 x 7.5). Take half of measurement for the top of the apron and mark that along the top of the tissue paper from the fold. On the open side of the tissue paper, mark the measurement for the distance from the top of the apron to the armpit. Draw a line from the mark at the top of the apron to the armpit mark. Cut along the line. Unfold and you should have a shape that looks like this:


Make the Apron:

Trace your pattern onto two different fabrics and cut them out. I chose one printed fabric and one solid covered fabric.

Place the cut-out pieces with the right sides together, and pin along the edges. Mark the places where you'll want to leave an opening for the apron tie -- near the edges of the top of the apron and at the bottom of the arpmit side edge. I used masking tape to mark these places so I wouldn't sew over them.

Leaving an opening at the bottom and where your tape is marked, sew along all of the edges, skipping over the areas where the tape is. It should look something like this:


Remove tape and turn right side out. Iron flat. Place the tape on the same openings along the top and sides of apron. Topstitch along the edges of the apron, closing the bottom of the apron and leaving the tape-marked spots open.

Stitch a seam parallel to the armpit side edges of the apron to create a casing for the apron strings, like this:


Remove tape. Pin a safety pin to one end of whatever you're using for your apron strings -- ribbon will work. (I used double-wide bias tape that I stitched closed.) Use the safety pin to help you thread the apron string through the bottom side opening, through the casing, and out the top. Then, loop the string down through the casing on the other side. The apron string can be adjusted to fit over the child's head. You can add a knot in the string at the bottom of the casing to help prevent the string from pulling all the way into the casing.

Other Sewing Projects that Make Great Gifts

Monday, April 16, 2012

Make It Monday: How to Make A Dry Erase Board

For several months after we moved into this house, we had a huge empty wall in our dining room. We are a family who loves to learn, so I knew early on that I wanted to turn it into a "learning wall" by hanging some writing boards there. The storebought solution would be to buy dry erase boards. But, they aren't exactly cheap. Ones on the cheaper end still go for about $15 or so and I wanted a collection of them on my wall. With our law student budget, I really couldn't justify spending $60 or more just on boards for our wall. Plus, storebought boards don't really have a whole lot of personality. I wanted some COLOR to liven up the wall. So, I decided to make my own.


The dry erase boards weren't really that difficult or expensive to make. I just took some old frames, cleaned them up, gave them a fresh coat of paint, and added some plain white posterboard under the glass. We just use plain ol' dry erase makers on the glass. I even found some colored washable ones that the girls can use without me worrying about them ruining their clothes.

Here's a general overview of how I did it:


I found these little beauties at the local thrift store. Obviously, I didn't care about the art inside the frames -- I just wanted a wood frame that could hold some paint. These cost between $4-6 each.

After cleaning them up a little bit, I painted them with some inexpensive craft paint that I picked up for $1/bottle at Walmart. One bottle per frame is more than enough. I had trouble finding the right shades so I ended up mixing colors to come up with what I wanted.

For the background, I kept it simple and used white posterboard cut to fit. Target had the cheapest white posterboard -- I think it was about $0.40 per sheet. However, if you wanted additional texture, you could try some lightly colored artist paper.


Since we plan on everyone in the family using these boards, I had Brett attach them to the wall with some brackets. We really don't want glass frames falling off of the walls and onto the kiddies!


When all was said and done, I spent about $25 for the entire wall.

-------------------------------------------
For other money saving ideas, be sure to stop by LifeasMOM on Fridays for Frugal Friday.

Monday, February 13, 2012

Make It Monday: Felt Flower Hairclip

Valentine's Day is upon us! Each year, I like to give my girlies a little Valentine's Day gift. Since they will be getting plenty of candy as school, I usually avoid candy gifts and typically opt for homemade gift. Last year, I made them some sweet little heart-shaped flax seed bags that can be used as a "heat bag" or an ice pack of sorts. This year, I made them some new Felt Flower Hairclips.


As you might imagine, with two little girls in the house, we like hair accessories. Honestly, I'm not a talented hairdresser, for myself or for my girls. I'd rather brush their hair and pop on a headband (aka "crown") or hairclip and call it good.


At our house, we do have a preference for flower hairclips. When Lucie was just an itty bitty, I made my first felt flower hairclip to keep her crazy bangs out of her face. It was easy to make -- I just glued together two flower shapes cut from felt, added a couple of felt leaves on the back and a rhinestone in the center of the flower. She wore that clip all the time. It was just about the only hairstyle that I could do with her hair. 


This past December, I shared how to make a simple Satin Flower Hairclip. These are a bit fancier...and a bit more dangerous to make since you use the flame from a tea candle.

My latest version of the flower hairclip is simple. To make them, you'll need the following:
  • felt in at least two colors - one for the petals and one for the leaves
  • scissors
  • hot glue gun
  • metal hairclip 
Instructions:

Using the flower petal felt, cut out eight ovals. Mine measured about 1.5 inches by 1 inch. Then, cut out five felt circles. Mine measured 1 inch across. Using the leaf felt, cut out a couple of leaves.


Apply a small bead to the bottom of a felt oval and press the sides together. It will pucker the petal a bit. Do this to all of the ovals.

Take one felt circle and apply glue around about 1/4 of the circle. Press the puckered end of two ovals onto the glue. Repeat all the way around the circle until all eight petals are affixed to the circle. You now have the base of the flower.


Take a felt circle and fold it in half, and then in half again. Place a small drop of glue on the pointed end of the folded circle. Press onto the center of the flower. Repeat with the other circles until you've created the center of the flower.

Flip the flower over and apply a line of glue where you want your metal hair clip to go. Open the clip and glue on the top side of the clip. Slip the felt leaves between the two prongs and make sure they adhere to the backside of the flower.


Monday, December 12, 2011

Make It Monday: Homemade Dog Treats

Welcome back to Make It Monday, a source for inexpensive homemade holiday gifts. The past two weeks, I've shared some girlie gift ideas - Paper Bead Necklaces and Sating Floral Hairclips. Today I'm changing gears and sharing a homemade gift idea for our canine pals.


Three of my four siblings have given me nieces and nephews of the canine variety. They don't have (human) children of their own, so their doggies are their babies. We are happy to have Chipper, Condie, Dax and Danny as part of our family. Last year, the girls and I decided to give these sweet dogs some homemade dog treats as gifts. The girls LOVED making them. They were quick and easy to make with the kids...and I think the canine cousins enjoyed their Christmas gifts!

Homemade Dog Treats

1/2 cup cornmeal
6 Tablespoons oil
2 cups whole wheat flour
2/3 cup water or broth*

*Be cautious when using broth. Onions can be toxic to dogs. Make sure that the broth or bouillion does not contain onion. I use Better than Bouillion Chicken Base which does not contain onion - at least not the jar I'm using now. Check labels carefully.

In a mixing bowl, combine all ingredients together well. Roll out dough to about 1/4-inch thick. Use cookie cutter to cut into dog-biscuit sized shapes. Bake 35-40 minutes. Let cool completely and store in airtight container.

For other homemade gift ideas, see my recent tutorials on how to make Paper Bead Necklaces or Satin Floral Hairclips OR check out my Make It Monday archive.

Monday, December 05, 2011

Make It Monday: Satin Floral Hairclips

I love it when I learn how to make something new from a friend. My dearest friend Jillian taught me how to make these little beauties. Every time I see one of my girlies wear one, I think of Jill and that is a very good thing.


Today, I'm going to share with you how to make these Satin Floral Hairclips for Make It Monday!

These Satin Floral Hairclips are really easy -- and inexpensive -- to make. They are also versatile. You can use them as a hairclip, of course, but also as a gift package topper or if you add a pin it can be worn as a broach.

First, a disclaimer here. This craft is of a somewhat dangerous nature because it involves using fire. Please use caution. I am not responsible for any mishaps that may occur while replicating this craft. Boom. There it is.

Materials Needed:
  • Costume Satin - the feel of this can vary. What is shown here is of a stiffer nature. While it was easier to cut, I do prefer the feel of a softer costume satin. Feel free to experiment.
  • Scissors
  • Tea light & match
  • Needle & thread
  • Rhinestone or other embellishment
  • Hot Glue Gun
  • Metal hair clip
Instructions:
  1. Cut out three satin circles of diminishing size - Large, Medium and Small. Make sure that your largest one is bigger than the hair clip you want to use. You don't want to be able to see the clip on the finished product.
  2. Light a tea light. Very carefully melt the edges of each circle by holding the fabric close to, but not in, the flame. This will keep the fabric from fraying. Then, hold the circle above the flame to pucker the fabric. Repeat this over several parts of the circle. Be careful not to scorch the fabric (or light it on fire, obviously).
  3. Once your circles are edged and puckered, stack them on top of each other by size with the smallest on top. With your needle and thread, stitch the three circles securely together. Tie off on the backside.
  4. Use the glue gun to adhere a rhinestone or other embellishment in the center of the flower.
  5. Cut out a small fabric oval shape that is as long as the prong on the hairclip. Seal the edges with the tealight just as you did the circles. Then, sandwich this between the two prongs of the hairclip.
  6. Apply some more hot glue to the back of the flower where you want the hairclip to go. Place the hairclip and the fabric oval securely over the glue. The fabric oval will prevent glue from sticking to the other prong of the hairclip...you know, so it will actually open as a hairclip.
Hints:
  • To make a circle easily, fold a square of satin into fourths, hold onto the folded corner and cut an arch from one side to the other. Open up, and you've got a circle.
  • Speed up the preparation by making several circles at one time. Just stack layers of satin and cut multiple circles at once. They don't have to be perfect since you'll be making them uneven with the fire anyway.
  • While little girls love these hairclips, I don't recommend that you let them get anywhere near the fire. However, you can involve them by letting them pick out colors of the fabric and embellishments.
For other inexpensive homemade gift ideas, check out my archive of other Make-It Monday posts. For other money-saving ideas, check out Frugal Friday at LifeasMOM.

Monday, November 28, 2011

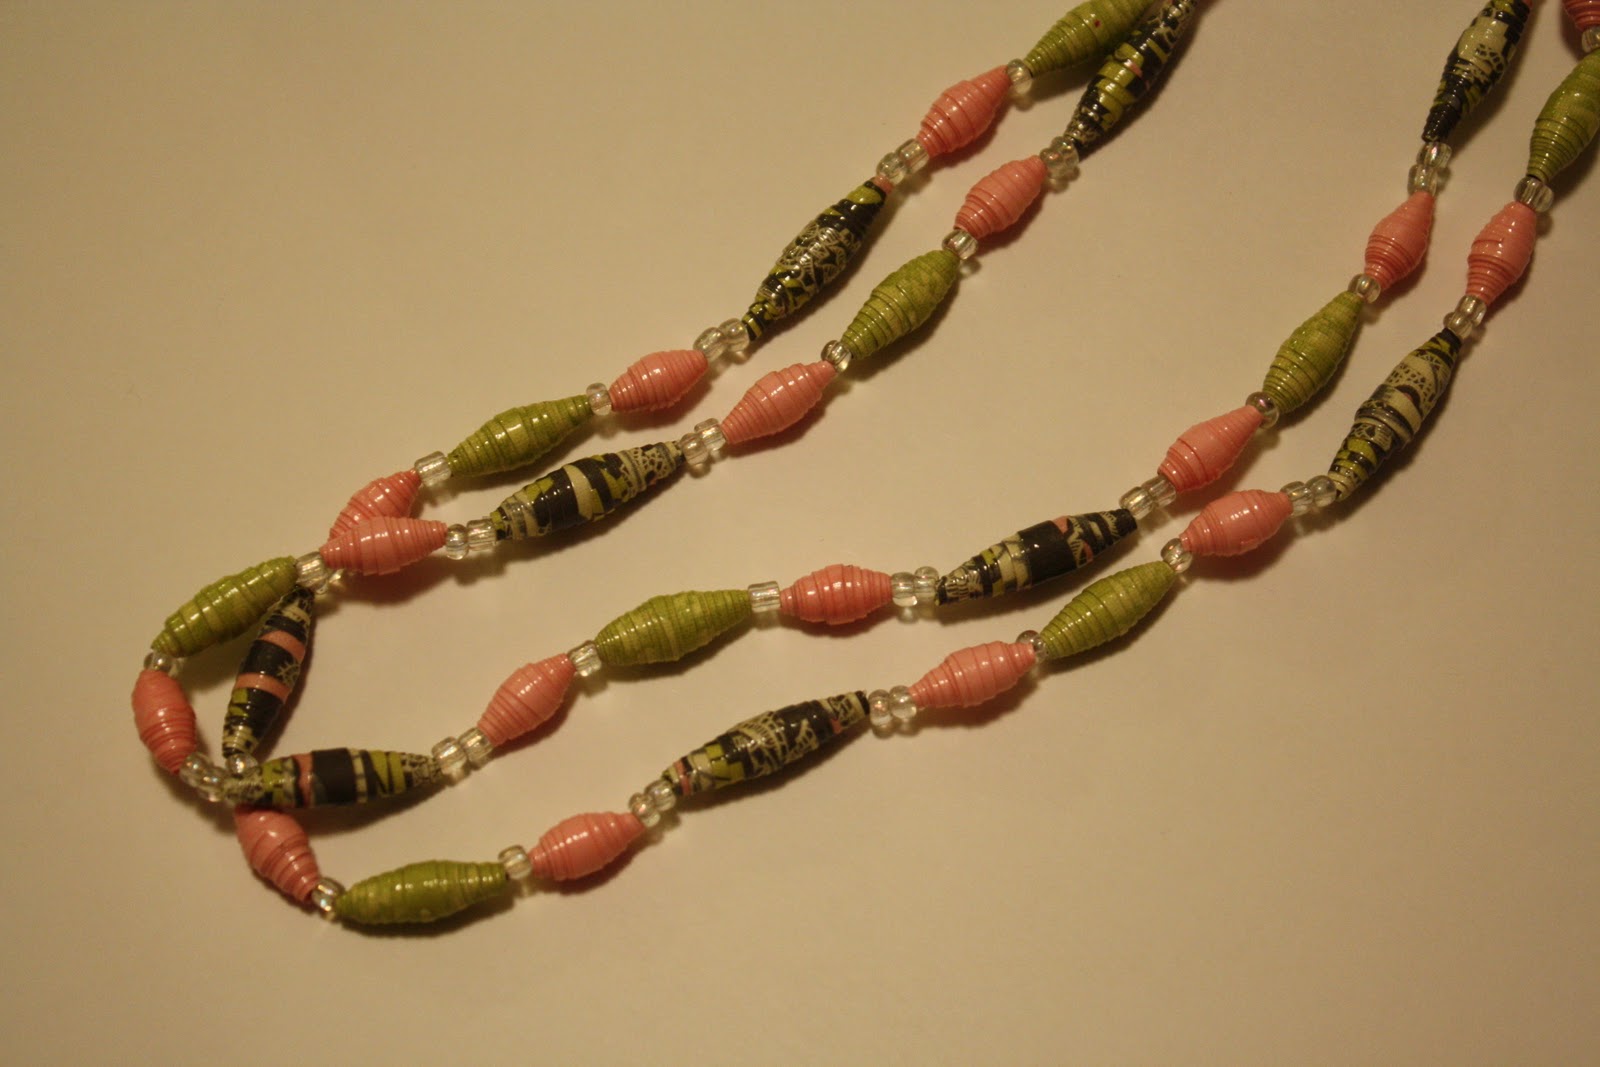
Make It Monday: Paper Bead Necklaces

Welcome back to Make It Monday! Over the next few Mondays, I'll be sharing some ideas for homemade gifts as I have done the past two holiday seasons. (For ideas from the past years, check out my Make It Monday page.)


Today I'll be sharing a little tutorial on how to make a super-inexpensive (but cute) gift -- Paper Bead Necklaces!

Made with stretch elastic, these necklaces are a versatile gift. Depending on the length of necklace you choose to make, you can wear it as a long necklace, a double necklace (equal lengths or unequal lengths) or wrap around your wrist several times to make a bracelet.
You can make these out of magazine pages or any scrapbook paper you have laying around. The size of the bead will vary by your choice of paper and the size of your triangle. The necklaces shown here were crafted out of triangles that were 6-inches in height and made out of thick scrapbook paper. You can also add traditional beads to your creation. I chose to use some very inexpensive glass seed beads alongside my handcrafted paper beads.

Best of all, you really don't need any special tools...just a little time and patience.

Materials Needed:
  • Scrapbook paper or magazine pages in the colors of your choosing
  • Scissors (or paper cutter)
  • Toothpick
  • Glue Stick
  • Modge Podge
  • Paint Brush
  • Stretch Bead Elastic (I found this for $2 at Walmart)
  • Conventional Beads (optional)

Instructions:
  1. Cut your chosen paper into long thin triangles. The length of the bead will be equal to the bottom of your triangle. I used triangles that were 6 inches high and 1-inch, 3/4-inch and 1/2-inch at the bottom.
  2. Apply glue stick to the side of the triangle strip that you do not want showing. Don't put glue at the fat end because that is where you will place the toothpick - you don't want the toothpick to stick to your bead. There you will place the toothpick and roll the paper tightly around the toothpick into a bead.
  3. Press the bead firmly to secure the glue. Use more glue if necessary. (Note: Thicker paper will be more difficult to hold its shape.)
  4. For bead durability, apply at least three coats of Modge Podge to each bead. Allow to dry 15-20 minutes between each coat. Allow to dry completely.
  5. Unroll a length of beading elastic that is as long as you wish your necklace to be. Do not cut the elastic just yet. This will make it easier to keep the beads on as you strig them. String the finished beads in your desired pattern on the beading elastic. When all of your beads are on the elastic, take the cut end and tie it to the other end of the elastic that is still attached to the spool. Double or triple knot to secure the necklace. Snip the elastic off of the spool.
This is a great craft to do with your kids. Although crafting the beads may be too difficult for very young children, even preschoolers can help create patterns and string beads onto the elastic. Working together to make a gift makes the gift even more special.

Looking for more homemade gift ideas? Check out these Satin Floral Hairclips or my Make It Monday Archive.

Do you have any homemade gift ideas? Share in the comments.

-----------------------------------
This post is linked to Frugal Friday. For other money-saving ideas, visit LifeasMOM on Fridays.

Monday, December 20, 2010

Make It Monday: Etched Glass Gifts

Welcome to the last Make It Monday of the Christmas 2010 season! Over the past couple of weeks, I've talked about some homemade gifts like flaxseed heating wraps, dancing ribbons & felt crowns for kids and flavored liqueurs. Today I'm going to talk about etched glass gifts.

I got this idea from another M.O.P.S. craft that we did a few years ago. Personally, I have only etched a small glass, lidded container (seen above) and a small oval mirror. But, basically you can use etching cream on all types of glass products -- drinking glasses, vases, candle holders, storage containers. You could even etch something on a glass bottle like the ones I used for my Vanilla Liqueur. One project that I would love to do with etching cream is to make a set of numbered wine glasses - no need for wine charms and no mixing up your glass with someone else's. Simple and cute. It's on my "to do" list one day.

Here's a basic explanation of how I've done this project in the past. We made our own templates with contact paper and an exacto knife However, keep in mind that the cream actually etches into glass, so it is caustic. Use it carefully and be sure to follow the instructions that come with your etching cream.

Here's what you need
  • glass item to etch
  • glass cleaner & towel
  • print out / template of your design
  • contact paper
  • exacto knife
  • plastic gloves to protect your hands
  • etching cream (such as Armour Etch Cream)
  • paintbrush
Here's what you do:
  1. Clean the area where you plan to etch your design with a glass cleaner.
  2. Transfer your design onto contact paper. When I made the container above, I used a computer print-out of the letter P, cut it out (including the loop of the P) and traced it onto the contact paper. Then use the exacto knife to remove your shape from your piece of contact paper. In my example, I ended up with a square of contact paper that was missing the shape of a P. I also cut out the inside of the P and used it as part of the template.
  3. Adhere your template to the glass and press firmly so that all edges are stuck completely to the glass. You don't want etching cream to get under the edges or it will blur your design.
  4. Wearing gloves and using a paint brush, apply a thick layer of etching cream to your design. Wait several minutes or as instructed by the cream's directions.
  5. Rinse the cream off thoroughly and remove your contact paper template. 
-----------------------------------
For other "Make It Monday" ideas, visit last year's posts -- the Playdough Kit, Family Calendars, Morning Out Kit, Romance Kit, Pizza Night Kit, and Personalized T-Shirts.

Monday, December 13, 2010

Make It Monday: Vanilla Liqueur

Welcome back to "Make It Monday," a source for homemade gift ideas and instructions. This Christmas season, I've explained how to make a Flaxseed Heating Wrap as well as the child-friendly Dancing Ribbons and Felt Crowns. Today, I'm going to talk about a homemade gift for adults -- homemade liqueurs.

Some liqueurs can be made rather quickly (typically those that use extracts) while others take some steeping time (typically those that use fresh ingredients like citrus peel). Last year, I made coffee liqueur as well as amaretto for two of my brothers-in-law. They were quick and easy to make, and had the benefit of tasting yummy together. (Just mix 1/3 amaretto, 1/3 coffee liqueur and 1/3 half-and-half and serve over ice.)

As for bottling up your homemade beverage, you can go the "green" way and recycle a glass bottle with a screw lid. Just be sure to sterilize the cap and bottle before filling them up. You can also check out stores for pretty bottles. I just bought the one pictured above from World Market (they're sold out online but you can check stores).

Recipes abound for different homemade liqueurs. Last year, I used All Recipes to research and read feedback about particular liqueur recipes. Here's one of their articles about making homemade liqueur if you're interested for more info. This year, I tried my hand at making some Vanilla Liqueur. Since it is made with an extract, it doesn't need steeping time. However, it will taste better after the flavors have some time to blend and mellow.


Vanilla Liqueur

1 cup water
1 cup sugar
1/2 cup brown sugar
2 cups vodka
4 Tablespoons vanilla extract

In a saucepan, combine the water and two sugars over medium heat. Bring to a boil and make sure all of the sugar is dissolved. Remove the pan from heat and let the sugar mixture cool for at least 20 minutes. Add the vodka and extract and stir well to combine. Store in a sealed bottle.

Amaretto Variation: Substitute dark brown sugar for the light and 2 Tablespoons of almond extract for 2 Tablespoons of the vanilla.

-----------------------------------
For other "Make It Monday" ideas, visit last year's posts -- the Playdough Kit, Family Calendars, Morning Out Kit, Romance Kit, Pizza Night Kit, and Personalized T-Shirts.

Monday, December 06, 2010

Make-It Monday: Felt Crowns & Dancing Ribbons

Welcome back to "Make It Monday". Each Monday from now until Christmas, I'm going to attempt to post some ideas for inexpensive, homemade gifts. Last week I started off "Make It Monday 2010" with instructions on how to make a Flaxseed Heating Wrap. Today, is your lucky day! You're going to get TWO homemade gift ideas for children instead of just one -- Play Felt Crowns and Dancing Ribbons. They would make a great stocking stuffer -- small, cute and inexpensive! It's easy enough to make several at a time and stash some extras for future gifts as well.

A couple of years ago, I read about the book Creative Play for Your Toddler: Steiner Waldorf Expertise and Toy Projects for 2-4s on a friend's blog. I loved the idea of simple, homemade toys and ordered the book primarily for the toy ideas. The book is filled with lots of projects; however, I discovered that many of them probably required more time than I wanted to spend to create them. One project that particular caught my eyes was "Crowns and Cloaks." At the time, Ella was going to have a Castle Birthday Party, and I thought it would be fun to make crowns for all of our little guests.


Inspired by the book, I decided to make felt crowns with one particular change that my brilliant mother had suggested. Rather than sewing elastic to the sides of the felt crown, I used an elastic headband.  This created a one-size-fits-all crown and simplified the process -- no worrying about how large a child's head was and not having to stitch the elastic on. (You can see the red headband in the photo above -- I got a pack of 5 at the dollar store and they were in basic colors. Perfect!)

For our party, I made the crowns ahead of time and allowed the children to choose rhinestones to decorate them. They told me where to place them, and I affixed them with a hot glue gun. Obviously, rhinestones can be a choking hazard for young children, so a sewn on felt embellishment might be a better choice for little ones. Use your common sense.

Play Felt Crowns

Here's what you need:
  • felt in your preferred color(s)
  • scissors
  • needle & thread
  • elastic headband (I got a pack of five at the 99 cent store!)
  • embellishments (sequins, small shapes of colored felt, rhinestones etc.)
  • hot glue gun & glue  
  1. Draw a template of what you'd like the front of your crown to look like.
  2. Trace your template onto a strip of folded felt and cut out.
  3. Sew decorations onto one side of the felt. If you choose to glue them on, you can do that now or later if you wish.
  4. Slip the elastic headband between the folded felt and then stitch around the crown to close it. You may want to reinforce the stitching near the headband.
  5. Glue on your embellishments if you haven't already done so.
Dancing Ribbons


Like many kids, my girls love to dance around the house. I made these simple dancing ribbons for my niece and my girls. Here's what you'll need:

  • a thick wooden dowel 
  • sandpaper
  • small eye screws
  • craft paint or wood varnish
  • several yards of ribbon in various colors
  • embroidery thread, fishing wire or elastic bead cord
  1. Cut the wooden dowel into several pieces to make handles. I cut mine to lengths of about 5 inches long. Use sandpaper to smooth the wood, especially the cut ends.
  2. Put an eye screw into one end of the handle. This might be difficult -- I used a set of pliers to twist it in.
  3. If you wish, you can either paint the handle or put some wood varnish on it. This takes more time, but I liked having a nice clear finish on mine. That way, you can wipe down the handles to clean them and the wood won't get stained by grimy little hands. I varnished them after I put the screw in so that I could hold it more by the eye screw while I worked and was then able to hang them to dry.
  4. Cut your ribbon into long lengths. Mine were about a yard long each. Fold over one end of each ribbon about 1/2-inch and stitch down to make a little loop. I used 5 ribbons for each handle.
  5. Thread some thread/wire/cord through the little loop and make a double knot. Then place the thread through the eye screw and tie tightly. Repeat with all ribbons. Initially, I tied mine on with embroidery thread, but I noticed that it has a tendency to come untied. So, I've repaired mine with elastic bead cord and it seems to be holding better.
-----------------------------------
For other "Make It Monday" ideas, visit last year's posts -- the Playdough Kit, Family Calendars, Morning Out Kit, Romance Kit, Pizza Night Kit, and Personalized T-Shirts.

For other frugal ideas, visit Life As Mom on Fridays for Frugal Friday!

Monday, November 29, 2010

Make It Monday: Flaxseed Heating Wrap


Last year, I instituted "Make It Monday" here on my blog. I featured a different gift that you could make/assemble at home each Monday in the weeks leading up to Christmas. If you followed "Make It Monday" last year, you'll recall the Playdough Kit, Family Calendars, Morning Out Kit, Romance Kit, Pizza Night Kit, and Personalized T-Shirts. I hope to continue that tradition again this year. However, since it is "Birthday Season" in addition to the Christmas season here at my house, I'm not making any big promises. But, I'll do my very best to keep it up. If you have any great homemade gift ideas, feel free to share them in the comments section!


Today I'm going to give some basic instructions on how to make a Flax Seed Heating Wrap. This is a useful AND frugal gift. Last year I made several of these for the ladies of the family, and they were a hit! My sister Jamie just used hers over the weekend and her friends were clamoring for their own. The price will depend on how expensive your fabric is and the cost of flaxseed in your area. I figured out that they cost me less than $5 to make last year, but I paid most of that for flaxseed that I got at the grocery store. If you're going to make several, go ahead and buy flaxseed in a larger quantity. Amazon sells Bob's Red Mill Whole Golden Flaxseed in a 4-pack for about $3.25/bag. You can check the internet for other sources, but Bob's Red Mill worked for me. It's also widely available in grocery stores. Just make sure you get WHOLE flaxseed and NOT flaxseed meal.

This gift requires some basic sewing skills, but it really isn't all that difficult to make. I am no seamstress, but I managed to make these successfully. I created separate channels to keep the flaxseed evenly distributed throughout the bag. I like the smell of heated flaxseed (it smells better that feed corn or rice in my opinion), but you could also add dried lavender or chamomile with the flaxseed for a different scent.

To make one of these babies, you'll need:
  • fabric of your choice
  • matching thread
  • whole flaxseed
  • sewing machine
  • iron
  • scissors
  1. Decide on the size that you want your wrap to be. I wanted mine to be a finished size of about 20 x 7 inches so that they could be draped around the back of the neck easily. Add a 1/2 inch to each dimension for a 1/4 inch seam allowance on each side. Cut two rectangles of this size.
  2. On each rectangle, fold one short end over about 1/4 (or 1/2 inch if that's easier) and press. These will be the ends you keep open to fill with flaxseed and then stitch together at the end of the project.
  3. Place the fabric rectangles right sides together and stitch down one long side, across one short side and then up the other long side. Keep the short side with the pressed edges open.
  4. Turn the stiched rectangles right side out and press flat with the iron.
  5. To make a nice edge, stitch around the same three edges about 1/4 inch in from the edge.
  6. To make stitching guides for the flaxseed pockets, fold the rectangle lenthwise and press with the iron so that there is a good guideline there. Unfold. Then fold the rectangle in half the other way and press another guideline. Unfold. Then fold the ends in to the center guideline and press them too. You should be able to see eight rectangles with the creases.
  7. Stitch from the bottom up to the top of the rectangle to create two main channels where you will dump in the flaxseed.
  8. Fill the bottom two rectanglular pockets with flaxseed. A funnel might make this easier. You want them to be full but not so full that it is difficult to sew that section closed. Figure out the amount of flaxseed needed for your size of wrap.
  9. Sew from one side of the wrap, over the center seam and to the other edge of the wrap to close off this section.
  10. Repeat until all of your sections have been filled. To make it easier to sew each section shut, you may want to prop your wrap on a book to support it at the sewing machine's level. Stitch the final section closed and then stitch the pressed ends closed again.
  11. Include instructions on how to reheat the bags. Make sure to stress the importance of heating in a clean microwave -- you don't want oil or food to get on the fabric and ignite the bag. Just 1 to 2 minutes should be sufficient to heat up the wrap. Since microwaves vary, begin at one minute and then adjust as necessary. Always be sure that the wrap is not too hot before use.
As you can tell from last year's "Make It Monday" gift ideas, I'm a big believer in "kits." Spend another $5 and you can turn a wrap into a "Cozy Evening In" Kit by adding a candle, chocolates and some tea bags or cocoa!

--------------------------------------------
If you're looking for other inexpensive gift ideas, stop by Life as Mom on Friday for "Gifts for $10 or Less" themed Frugal Friday!

Monday, December 14, 2009

Make-It Monday: Personalized Shirts

Okay, I admit it. I slacked off. I neglected to post an idea last week for Make-It Monday last week. I'm so sorry!

My excuse? Well, things got a little nuts with our road trip to Oregon, the ensuing recovery period and then the preparations for my hubby's bday and our first family trip to Disneyland. Sadly, Make-It Monday slipped through the cracks. But, I'm back today with another gift idea.

But first, let's recap the previous Make-It Monday ideas:
Today, I'm returning to the child-theme again. I confess, I haven't actually made this particular gift, but I have been the recipient of two, or rather my girls were. It's a super-cute and frugal gift - personalized shirts!


When Lucie was born, Naomi, an out-of-state friend, made these cute t-shirts for the girls. Being a mother of multiple kids herself, Naomi not only sent a shirt for the newborn baby but one for the big sister as well. Although they may be low in cost, they are high in the cuteness factor!

All you need is a plain white shirt, a pencil, a needle and some colored embroidery thread. Rather than using just a plain Hanes t-shirt, Naomi used shirts that had a more stylish looking sleeve. I think that they were probably only a few dollars -- I bought some similar ones from Walmart when Ella was little and I remember them being inexpensive.

Directions:
  1. Using the pencil, lightly sketch out the child's name on the shirt using small x's. You could look for a cool looking font on the computer and try to replicate it by hand. (Naomi used a more girly-looking script that I just love!)
  2. Using the needle and thread, cross-stitch over the small x's to form the name. For more visual interest, use different colors for each letter.
  3. You can wash the shirt to remove any visible pencil marks.

Tuesday, December 01, 2009

Cyber Holiday Shopping Ideas

I hope that you had a great Thanksgiving and time with your loved ones. We just had a whirlwind trip up to Oregon and back in less than a week. It was good to be with family but the drive from California is a killer.

Hopefully, you were able to drop in yesterday for Make-It Monday for the 4th week of homemade gift ideas. I'll continue posting some ideas up until Christmas for those looking for a handmade touch to their gifts. However, now that the holiday shopping season is officially on with the passing of Black Friday and Cyber Monday, I thought that I'd share some ideas of gifts that are handmade...by other people. I confess, I know all of the artists described below and have seen their work first-hand. Actually, I own something from each of them and love what I own. If you're looking for a gift with a special touch, why not check out their sites to see if there is something to your liking?!


Artwork by Peter K. Mathios: We are blessed to have Peter in our family. He truly has a wonderful talent. Over the years, I've seen many of his paintings up close -- they are truly amazing. He is the 2009 International Ducks Unlimited Artist of the Year AND his one of his painting recently tied for 7th place in the 2010 Federal Duck Stamp Contest. Yes, original paintings don't really fall in the "frugal" category. But, his art is a great value. He sells large original pieces as well as prints. I love his new "Ending Rain", a 16 x 24 giclee print ($285) - seen above! Oh, and his "Spring Chickens", a 7 x 11.5 giclee print, will be available in January ($195). I so admired the original and I'm excited that it is now available as print!


For someone who wants an original for the price of a print, his original small daily paintings are perfect. I love his new "High Skies Mallard, 5 x 5 acrylic ($245) - seen above.


For those on a budget, you can get a sampling of several of his paintings with his set of 4 Thirstystone Coasters featuring Waterfowl artwork (only $20) or his Birds book that features over 60 color images ($40)!


Ebooks by Jessica Fisher (aka FishMama): My big sister Jessica has three downloadable ebooks available -- all food related. You can download them instantly and create a gift around them:

Cooking with Kids or Pretty. Cool. Cakes. : Download the ebooks ($4 each or $6 for both) and have them bound for $3 - $5. Then, add onto the gift with cooking utensils. Target has a child-size baking kit (rolling pin, cookie cutters & whisk) for just $2.50. A child-size apron would be great too! I recently created a rather large gift basket for a Silent Auction around these two cookbooks. Check it out here for some other ideas of what you could include.


Muffin Kit: I saw this on her blog LifeAsMom the other day and I just LOVE it! This $1 download is a super easy and frugal gift idea. The download includes the recipe, printable gift cards and instructions on how to make a Muffin Kit.


Bedazzled Hair Clips by Jamie: Jamie is my other wonderfully, creative big sister. Everything she creates is just beautiful. I have one of her hair clips and it adds just a bit of "fancy". (Okay, so really it was Ella's hair clip and I've swiped it.) Jamie also uses high-quality Swarovski crystals in her hair clips. You can pay big bucks for something similar in a department store...but just $7 (plus shipping) through Jamie's etsy shop. You could even use one of these hairclips as a gift AND as a creative way to decorate a package.


And speaking of Etsy, it is a great place to shop for handmade items and support a small business owner! They make it easy to find just what you want. There you can search by category or even by color. Say you have a sister who loves chartreuse. Just type chartreuse into the search engine and up pops items from all categories with that word in their listing. Even if the word search doesn't lead you to the perfect item...it might lead you to the perfect shop. And even if you can afford something that you see, browsing might give you the inspiration you need to make your own handmade gift.

Monday, November 30, 2009

Make-It Monday: Pizza Night Kit

Welcome back to "Make-It" Monday - the place to get some ideas for homemade (or semi-homemade) gifts! If you have a great homemade gift idea, be sure to leave it in the comments section.

Now, if you've been following "Make-It Monday", you'll know that I am a big fan of "kits". I've talked about a Playdough Kit for kids, a Morning Out Kit for the ladies and a Romance Kit for their men. Today, I'm going to share an idea for a Family Pizza Night Kit.


In our house, Friday is usually Pizza night. We love pizza but eating out (or getting delivery) is just not budget-friendly. So, over the years, I've learned to make pizza. If you have a KitchenAid mixer with a dough hook, it's a cinch to make the dough. A tasty homemade sauce takes just 10 minutes to make. And as for the assembly, kids really enjoy helping out with that. It can be a fun family activity.

A basic Pizza Night Kit would include:
  • A quart-sized jar filled with the ingredients for the dough (flour, packet of yeast, salt, and cornmeal).
  • Ingredients to make the sauce (can of tomatoes & tomato paste, spices).
  • Pizza Recipe - dough, sauce & baking instructions
  • Pizza pan(s) - our local Ace Hardware had some great individual sized ones for just $3.99 for a set of two (GS EZ-Baker Heavyweight Steel Bakeware Pizza Pans).
Of course, you're gift recipient will need to provide some of the ingredients like oil, etc. Just be sure to specify in your recipe what they need to provide.

A more deluxe Pizza Night Kit might include:
  • Pizza Cutter Wheel
  • A Board Game (make it a Family Pizza & Game Night Kit) OR
  • A DVD (make it a Dinner & A Movie Night Kit)
Not sure how to make pizza? I'm sure there are other recipes out there on the internet that you can use, but this is what I do:

Homemade Pizza

Homemade Pizza Dough
Homemade Pizza Sauce
1 (8 ounce) package fancy shredded mozzarella cheese
toppings of your choice (pepperoni, sausage, mushrooms, peppers, tomatoes, etc)
1 Tablespoon cornmeal

Divide pizza dough into four sections (if making individual-sized pizzas) or two sections (if making two 10-inch pizzas). On a lightly floured surface, turn each portion into a dough ball and then flatten out to make a round dough. Grease your pizza pan or baking sheet with oil and dust with cornmeal. Place your dough on the pizza pan and top with sauce, cheese and toppings of your choice. Bake at 450 degrees for 15-20 minutes.

Homemade Pizza Dough
1 package (or 2 1/4 teaspoons) active dry yeast
1 1/4 cup warm water
dollop of honey (optional)
3 - 3 1/2 cups of flour
1 1/2 teaspoons salt
1 Tablespoon olive oil

Place the dough hook attachment on your KitchenAid mixer. In a warmed mixer bowl, dissolve yeast in 1/2 cup warm water along with a dollop of honey (if using). Allow to proof. Stir in remaining water, 3 cups flour, salt and olive oil. Mix well for about 5 minutes. If dough is too sticky, add a bit more flour. Place in a greased bowl, turn to coat with oil and cover. Set in a warm, draft-free area and allow to rise until doubled in size, about 1 hour. When dough has risen, punch down and let rest for 10 minutes more.

Homemade Pizza Sauce
1 Tablespoon olive oil
2 cloves garlic, pressed through garlic press
1 can (14.5 ounces) crushed tomatoes
1/2 teaspoon dried oregano
1 1/2 teaspoons dried basil
1/2 teaspoon salt
pinch pepper
1 Tablespoon tomato paste

In a saucepan, cook garlic in olive oil over medium heat, stirring for 1 - 2 minutes. Add the tomatoes (with juice) and spices. Reduce heat and cook, stirring frequently until juices evaporate, about 10 minutes. Stir in tomato paste and cook for 2 minutes.

--------------------------------------------------------------------------
For other food gift ideas, be sure to check out Ultimate Recipe Swap on Thursday at Life as Mom.

Monday, November 23, 2009

Make-It Monday: Romance Kit

Welcome to Week #4 of "Make-It Monday" -- a place to get some ideas for homemade or semi-homemade gifts. Over the past few weeks, I've shared some ideas for gifts for the young children, family members and ladies in your life. Well, what about gifts for men?!

Yes, that was my very question last year! For the past few years, we have been gifting my husband's family members with homemade or semi-homemade gifts at Christmas. Usually, we come up with an idea and make different versions of the same gift for each person or couple. Well, last year I had plans to make "Morning Out Kits" for the ladies in my husband's family as well as for one of my sisters. Although their husbands might have enjoyed a coffee gift card, I didn't see them enjoying a fabric coffee sleeve or embellished journal. So, I had to get creative. I needed to create a gift that would be welcomed by a talented wildlife artist, a former youth pastor turned assistant director of a consulting company, computer systems administrator, and a general contractor. They've got various interests but one thing in common. They love their wives. So, I enlisted my husband's help and created a Romance Kit!


In our version of the kit, we included:
  • A card explaining the gift (authored by my husband -- I didn't think it would come across as well if it came from me. You know, a woman telling another man that he should romance his wife? Yeah, that's a job better suited to my husband.)
  • A mini bottle of champagne. You should be able to find mini bottles of nicer bottles of champagne in a liquor store or somewhere like World Market or BevMo. However, you should be able to find a 4-pack of Cook's champagne at your local grocery or drug store...at least in California you can.
  • Some chocolate. My preference is Lindt Lindor Truffles or Ghiradelli Squares are nice too! You can buy one bag and split it among several gifts. Or, a mini box of chocolates would be great too. See's Candy sells a small Mini Holiday Fancy Box (through fundraisers) that would fit the bill nicely.
  • A candle. I purchased a multi-pack of small tea light candles in glass holders and put one in each gift. Right now, candles are going on sale at drug stores. You should be able to get them very inexpensively - probably even 50% off for holiday scents. (I think Rite Aid has that sale going on this week.)
  • Massage Oil. You can purchase a multi-pack of six small bottles (0.5 ounce) of KY Touch Massage Oil in various scents.
This makes a pretty frugal gift if you make several of them and spread the expense across them all. Plus, there isn't really much handmade about it at all -- just buy the various items, write a card and package it up.

It would also be a good gift for newlyweds or new parents who need time to reconnect. You could easily turn it into a Date Night gift by throwing in a gift card to a restaurant and an offer of babysitting. What parent wouldn't love that?

I'm not sure how many of my recipients actually used the gift (yeah, I didn't ask), but it was good for a laugh. Especially, when they read the card that was authored by my husband (here's what he wrote):

Okay, here's the deal.
Your wife has received a "Woman's Morning Out Kit".
She thinks this gift is for her, but in reality when she comes home she will be ready for an...
EVENING WITH HER MAN.

It is in fact, just part 1 of 2 gifts designed for you, her husband.
When she comes home, she'll be all fulfilled and warm inside from all of her introspection and self-reflection. Now is the time to turn on the charm and use your kit:
Have the champagne chilled, the candle lit, and the chocolates and massage oil out.
Oh, and make sure the kids are in bed or at their friend's house.
Good luck and have a Merry Christmas!


Monday, November 16, 2009

Make-It Monday: Morning Out Kit

Welcome back to "Make-It Monday" -- the place to find ideas for homemade or semi-homemade Christmas gifts. The past two weeks I've talked about a Homemade Playdough Kit for kids as well as Family Calendars. If you have a great homemade gift idea, be sure to share it or a link to your website in the comments section!

And on to today's subject -- A Morning Out Kit!


In general, I'm not a big purchaser of gift cards. Yes, I believe that the gift card is a great invention, and personally I enjoy receiving a gift card just as much as the next person. However, I have a hard time giving just a gift card. Even if I know that my sister-in-law Aimee would LOVE a gift card to Starbucks, part of me still feels as if I didn't put enough personal touch to the gift. If I have the time and inspiration, I will create a "kit" around the purchase of a gift card. Once I know what kind of gift card I want to buy, I think about how I can expand the gift card into an experience by creating a "kit".

Last Christmas, I did just that for some of the women in my life. I bought several $5 gift cards to Starbucks and created a "Woman's Morning Out" kit. The kit consisted of:
  • Woman's Morning Out Explanation: When giving a kit, I always like to include a card that explains the purpose of the gift as well lists the items in the kit.
  • $5 Gift Card to Starbucks
  • A reusable fabric coffee sleeve
  • A hand-embellished journal
Although I tailored mine to women, you could make a similar gift for men as well. Or, throw a paperback book into the mix for the Book Lover in your life. I made things easy for myself by purchasing some small, pre-decorated gift boxes and wrapping the kit inside with tissue paper. Just by looking at those boxes, I knew what was inside. You could make several and keep some on hand for hostess gifts or those last-minute gifts that we sometimes need.


Reusable Fabric Coffee Sleeve

thick, fleece fabric (for the inside of the sleeve)
patterned fabric (for the outside)
thread
scissors & sewing machine

  1. Using a paper coffee sleeve from your coffeeshop of choice, trace it on paper. Draw another line 1/4 inch out from that line for your seam allowance. Cut it out and this is your pattern. Note: You may want to make sure that your sleeve fits the cups at the store where you intend to buy your gift cards. Cups at Starbucks are tall and thin, whereas the cups at Peet's are shorter and thicker. A sleeve designed for Starbucks may not work at Peet's.
  2. Cut two pieces of fabric from your pattern -- one from your patterned fabric and one from fleece. Put the right sides together and sew along the top and the bottom -- leave the ends open so that you can turn it right side out.
  3. Turn it right side out and iron flat.
  4. Top stitch along the top and bottom edges.
  5. Fold the sleeve tube in half with the patterned sides together. Line up the unsewn edges and stitch together to form your sleeve. Trim excess fabric if needed and turn right side out. Double-check to make sure that it fits the cup before you give it as a gift!
Here's a tutorial with pictures that has a slightly different design.

If sewing is not your thing but you want a fabric coffee sleeve, check out Etsy for something to your liking! You can find them for about $5 - 8. Certainly not as cheap as homemade, but they are cute and eco-friendly.


Paper-Embellished Journal


basic composition book
scrapbooking paper (12 x 12 paper works well)
ribbon or other embellishments

  1. Trim paper to the right size to cover your composition book. A 12 x 12 piece of scrapbooking paper won't quite cover it completely. But, you use separate pieces and cover the overlap with embellishment. Or, use a piece of 8 x 11 for the front and back covers and leave the spine uncovered OR use a separate piece to cover the spine.
  2. Adhere paper with modge podge.
  3. Cut out embellishments and adhere them with modge podge.
  4. If you wish to seal the journal, cover with a thin layer of modge podge and allow to dry completely.
I made the green journal pictured above with scrapbooking paper and modge podge for my sister Jessica last year. However, recently I tried my hand at creating a FABRIC cover for a basic composition journal. If you have excess fabric and can stitch a straight seam, you might want to try this version. Added bonus - you can make the journal match your coffee sleeve AND can reuse the cover on another journal when the first one is filled.

Fabric Journal Cover


composition book
fabric
thread

1) Measure the book that you want to cover.
  • Height: Add 0.25 inches to the height to make sure that the opening is wide enough PLUS another 0.25 inch for the seam allowance on each side. For a journal that is 9.75 inches high, my measurement would be 10.5 inches.
  • Width: Measure the journal from the edge of the front cover, over the spine, to the edge of the back cover. Add 3 inches (or more) for the wraparound on each side PLUS 0.5 inches to hem in the opening on each side. For a journal that is 15.25 inches wide, my measurement would be 22.25 inches.
2) Cut two rectangles with these measurements. (If you want to get fancy, stitch together different pieces of fabric to create your rectangles. For the one pictured above, I stitched a piece of floral fabric over my orange rectangle where the journal spine would go.)

3) Fold over the edge of the rectangles by 0.5 inches and hem.

4) Place the right sides of the rectangles together together and stitch along the top with 0.25 seam allowance.

5) Turn right side out and iron flat.

6) Wrap the cover around the book and insert the cover into the opening on the edges.

-------------------------------------------------------------------------------
For other money saving ideas, check out Frugal Friday at Life As Mom every Friday for one of Jessica's tips as well as links to other bloggers' ideas!

Monday, November 09, 2009

Make-It Monday: Family Calendars

Welcome back to Make-It Monday where I share with you some ideas for homemade (or semi-homemade gifts)! Last week, I talked about an easy Playdough Kit for kids. Today, I'm going to talk about a gift that I have enjoyed receiving AND giving to others -- Family Calendars!


Years ago when she was a new stay-at-home mom with a limited budget, my sister Jessica made calendars for everyone in our family. Using the scrapbooking supplies she had at home, various family photos (some old, some new) and computer software, she created personalized calendars. She even added all of our birthdays on it as well. I absolutely loved mine and still have it to this day, 10 years later. This page in particular got me -- me as a baby with my Grandpa John and sister Jamie. Old family photos are soooo wonderful to intersperse with more recent ones. They can just inspire an "ahhhh" and bring back special old memories.


When my husband and I were dating and he was a starving graduate student, he enlisted my help in creating calendars for his family. Together, side by side, we crafted similar calendars for his parents and siblings. On a funny sidenote, Brett strategically placed a photo of a particular family member and his then-girlfriend strategically early in the calendar betting that they wouldn't last through to the end of the year. (They didn't.) When he put OUR picture on the December page, I said "How do you know we'll still be together in December?" he just smiled and said "We will." Little did I know that he'd propose just a couple of days later!

Anyway, as expected, the calendars were a hit with Brett's family and they requested them again the next year. Since they weren't reuseable in the way that we originally designed them, we decided to change the format somewhat the following year. We designed the month name/photo page with photo corners so that the photo could be swapped out in future years. The actual monthly calendar was printed on a separate page, trimmed down and affixed to the bound calendar with photo corners as well. Then, in subsequent years, we could just gift them with additional calendar pages and indivdual photos rather than scrapbooking an entire calendar. It allowed us to continue the tradition without having to labor over the details.

For a basic calendar, you need:

  • 13 pieces of thick cardstock
  • computer software to design your calendar
  • scrapbook paper for embellishments
  • family photos
  • glue or photo corners
  1. Design the calendar on the computer and include important dates (birthdays, anniversaries, etc.).
  2. Print the calendar on 12 sheets of cardstock (landscape orientation). Collate the pages and place another blank piece of cardstock on top. The blank piece will be your cover page.
  3. Decorate the cover page and the individual month pages with photos, quotes or verses and the name of the month. (These will be the blank sides of the calendar pages.) It's always nice to coordinate your photos with events in the month.
  4. Have the calendar bound at a store like The UPS Store, Staples, Copy Max or FedEx Kinkos.

If you don't have computer software to design your calendar easily OR if you're not all that great with preparing documents on the computer, check out my 2010 Printable Photo Calendar Kit in my Etsy shop. It's a printable PDF that includes the 12 monthly calendars plus different options for the cover and month title pages for just $4. Want to add your own personalized dates? A personalized version is also available for just $7. Plus, you can print as many copies as you like!


-------------------------------------------------------------------------------
For other money saving ideas, check out Frugal Friday at Life As Mom every Friday for one of Jessica's tips as well as links to other bloggers' ideas!

Monday, November 02, 2009

Make It Monday: Homemade Playdough Kit

Welcome to Make-It Monday! For the weeks leading up to Christmas, I'll be posting some homeade, or semi-homemade, gift ideas. Today I'll give you some tips on how to make an inexpensive and very child-friendly gift -- a Playdough Kit.


A couple of years ago, we decided to gift some of Ella's little friends with homemade playdough. Although you can get Play-doh sets at Walmart or Target, it is fun to make your own, your kids can help AND you can personalize the kit for the recipient. Plus, most likely, you've already got the ingredients for playdough in your pantry so it can be very economical as well.


To make a basic kit, you need:
  • Homemade Playdough, of course! It's also nice to include a recipe card so that the recipient can make more when needed. You can also personalize the kit by making playdough in the child's favorite color(s).
  • Small airtight containers or ziploc baggies to hold the playdough
  • A rolling pin. Look for a child-size version at a toy store OR just cut a thick dowel from the hardware store into child-size lengths.
  • A vinyl placemat. I purchased some vinyl tablecloth off the roll at my local Ace Hardware and cut it into the sizes that I wanted.
  • A container or bag to carry it all. You could buy a container at the dollar store or sew some cool fabric into a simple bag with a drawstring.
  • Cookie cutters are also a nice addition. You could personalize the gift by choosing cutters that are related to the child's particular interests.
Playdough recipes abound on the internet. When I made it for gifts years ago, I used an uncooked Kool-Aid Playdough recipe. If you try that recipe, hands down, it will be the best smelling playdough you've ever come across. The result smelled wonderful but the consistency of the different colors/scents was, well, inconsistent. Some were downright sticky. Because of that experience, I think that cooked playdough produces a better result.

I recently came across this recipe that I love! It is the best homemade recipe I've found thus far. Although it doesn't smell as nice as the Kool-Aid playdough, the vanilla is a nice but more subtle scent. Also, by adding the food coloring with the water, the color gets evenly distributed without having to knead it forever. I used liquid food coloring (primary and neon) that I had in my pantry, but if you're looking for other colors like black or brown, try the paste food coloring that you can find in the cake decorating aisle at Walmart or your local craft store. This recipe makes the equivalent of two playdough canisters and you can halve it if you wish with the same results.

Also, because playdough does dry out, you shouldn't make the playdough too far in advance of giving your gift. Just go ahead and buy the other pieces of the kit early on and then make the playdough before gifting it. It takes only about 5 minutes to make a batch!


Homemade Playdough

(makes the equivalent of 2 Play-doh canisters)


1 cup flour
1/4 cup salt
1 teaspoon cream of tartar
1 cup water
1 Tablespoon oil
food coloring
1 Tablespoon imitation vanilla extract


In a saucepan, whisk flour, salt and cream of tartar. Add the water, oil and as much food coloring as needed to reach your desired color and whisk until smooth. Cook over medium heat, stirring with a wooden spoon, until almost set (it will get difficult to stir). Add vanilla and stir until combined. It may look a little lumpy after being cooked but once you knead it by hand it will be smooth and pliable.


Kool-Aid Option: You can experiment with color and scent by adding 1 or 2 packets of unsweetened Kool-Aid to the recipe in place of the food coloring and vanilla. However, all flavors of Kool Aid might not work as well. I tested it out with two flavors that I had on hand, Lemonade and Grape, and the results were okay but not great. The lemonade hardly added any color at all and I ended up adding yellow food coloring. The grape smelled good but the color was rather muddy. I ended up adding some food coloring to boost the color a bit. From past experience, I bet the Tropical Punch would work well.


Share your ideas! Got a great homemade gift idea of your own? Share your idea or a link in the comments!


-------------------------------------------------------------------------------
For other money saving ideas, check out Frugal Friday at Life As Mom every Friday for one of Jessica's tips as well as links to other bloggers' ideas!