Showing posts with label Create. Show all posts

Monday, March 04, 2013

DIY Woven Felt Coasters


It's March! Time to take down the Valentine's hearts and add some splashes of green around! Coasters are an inexpensive -- yet useful -- way to change up your decor. 

Last month I made some fun little coasters out of ceramic tiles. With the "I love you" written on one, they had a bit of Valentine's Day flair. This last week, I created some new GREEN coasters that would be great for St. Patrick's Day.

Do you remember paper weaving? We used to do it every year in elementary school to make Thanksgiving placemats. I always loved doing it. Last week, I called on those long-unused paper-weaving skills and tried it with felt for my coasters. It was rather enjoyable to do. Stop by DIY Your Way today to learn how to make your own DIY Woven Felt Coasters.  

If you like paper weaving, this woven paper storage box is a fun project too. I just love to re-purpose something and make it pretty. These boxes turned out even better than I thought they would. I would love to make more...I just gotta find the time to do it.


Monday, February 11, 2013

Natural Living & Brown Sugar Hand Scrub Recipe


The last few years, I've become interested in using more natural products. I suppose, it probably started with a trip to the Lush store in Santa Barbara. Lush is a handmade cosmetic company that uses natural ingredients. It's not cheap, but it is a splurge that I enjoy once in awhile. A product from Lush can always bring a smile to my face. Because Lush is not really in the budget, I've been interested in trying to make some of my own natural bath and beauty products.

I'm slowly building a collection of supplies with which to create yummy natural stuff. I really want to get more essential oils and learn how to use them. The different scents always give me a lift. However, it seems as if VA is not as big into "natural living" as CA. Although Williamsburg is a much larger town than Solvang, it doesn't have a natural foods store where you can buy things like essential oils. Or, at least I haven't found one.

So, I do a lot of my research online. I've seen so many ideas that I want to try that I started a Natural Living Pinterest Board to keep them all easily accessible. Maybe this will help keep my thoughts organized and I'll experiment some more.

One product I have made successfully is a Brown Sugar Hand Scrub. We made it at MOPS a couple of years ago. Of course, since it is made of oil, you've got to be careful if you're going to use it in the shower. I keep this above my sink to use after I do the dishes. (Yes, I do the dishes by hand.) After I was it off, I blot my hands with a paper towel to get rid of the slightly greasy feeling. 

If you're interested in "natural living" too, I thought I'd mention a few things that are going on this week:


Oh, and of course, I'm sharing my recipe for hand scrub!


Brown Sugar Hand Scrub


1/2 cup extra virgin olive oil
1 teaspoon vanilla extract
1 teaspoon Vitamin E oil
1/2 cup + 1/3 cup brown sugar

Pour olive oil, vanilla extract and Vitamin E into 8 ounce jar. Mix very well. Then, add sugar and carefully stir until well blended (it will not dissolve). To enjoy, scoop some of the scrub into your hand and massage gently into your skin. For best results, leave on skin for 3 to 4 minutes before rinsing.

Other Scrub Ideas:
  • White Sugar Scrub: We made a different version at MOPS last year. I can't remember the exact recipe, but it used white sugar, massage oil, and essential oil of your choice. You can try and experiment to find your own favorite creation!
  • Lavender Hand Scrub: Life as MOM posted a recipe for this back in December. Yummy!

Friday, February 08, 2013

DIY Rolled Felt Flower Wreath for Valentine's Day


I really enjoy making crafts, and I enjoy it even more when I can use the supplies that I already have. I mentioned before that I have a TON of felt, even after the many, many felt crafts I've made.

With Valentine's Day right around the corner, I decided to make a dent in my felt stash by making some rolled felt flowers. They're similar to the paper flower arrangement than I made at Christmas -- but even easier. Although you can find heart-shaped wreath frames, I decided to make a frame out of some craft vine wire leftover from my braided vine napkin rings. A little hot glue and ta-da! A cool Valentine's Day wreath.

Want to make your own? Stop by DIY Your Way to see my step-by-step tutorial on how to make this fun Valentine's Day wreath!

Wednesday, February 06, 2013

DIY Ceramic Tile Coasters


Yesterday, I made a super simple craft at my Mothers of Preschoolers group -- DIY Coasters. Although I didn't design this particular craft, it is pretty similar in theory to the Hand-Painted Trivets that I shared at Life as MOM over the holidays. Like the trivets, these coasters are a kid-friendly craft too.

These DIY Coasters really are fast to make and can really be customized for the recipient. They'd be great as a housewarming, hostess, teacher, or even wedding gift.

At MOPS, we used scrapbook paper as the decoration, but you could get creative with another type of paper. You could try using:
  • artwork from your kids
  • family photographs
  • maps of places you've lived or places you've visited
  • printout of your favorite sports team's mascot or logo

A couple thoughts about paper and ink:
  • A thicker paper will work better than a thin one. When you use Modge Podge, thin papers can tend to get a bit wrinkly when they're glued down and coated. A more cardstock type paper will hold up much better.
  • If you print something from the computer, a laser print is a better choice than ink jet. Since ink jet uses a liquid ink, it may smear a bit when you coat it with Modge Podge. If you don't have a laser printer, print it or color-copy it at the photocopy store.
  • If you're using original artwork made with markers, you might want to make a laser or color-copy for the above reason.


How to Make Custom Ceramic Tile Coasters

Supplies:
  • 4.25" square ceramic tiles from the home improvement store 
  • small circular felt pads 
  • scrapbook paper
  • pen or pencil
  • scissors
  • Modge Podge 
  • foam brush

Directions:
Flip the tile over and place a felt pad near each corner on the bottom side of the tile. These pads will help protect your table surface from the scratchy underside of the tile.


Use scissors to cut the decoration out of your scrapbook paper. You can use a smaller square (as I did -- mine measured 3.75" square) to leave a bit of a tile border around the edge. At MOPS, the craft team made square templates for us to trace onto our paper. That made it very easy to trace a particular portion of the scrapbook paper for my coaster. But, you don't have to use a square -- trace shapes out of your scrapbook paper if you want to. Get creative!

Use the foam brush to brush some Modge Podge on the back of your scrapbook paper square or decoration. Affix it to the top of the tile. Press firmly to ensure that you don't have any air bubbles underneath. Double-check that the edges of the paper are firmly adhered to the tile.

Coat the entire top of the tile with Modge Podge. Allow to dry completely. (If needed, you can speed up the process with a hair dryer.)

Give the tile another coat of Modge Podge. If you wish, you can brush in the opposite direction to give a sort of "canvas" like brushstroke pattern. Allow to dry. 

Thursday, January 24, 2013

DIY Mantel Words Tutorial


It's been quite the week here. We had a string of cold, gloomy days that coincided with one of the girls having a 3-day fever. I don't think I realized how much being cooped up with a sick kid had affected me until Brett took them both out of the house on Friday.

The sunlight was (finally) streaming through our front windows, and I had the house to myself. Oh man, it was lovely and just the break that I needed. It also gave me a chance to do a little crafting.

Inspired by the approaching Valentine's holiday and the book Love Does by Bob Goff, I created these these DIY Mantel Words with free and inexpensive materials. They were simple and cheap to make. It makes me happy to see them sitting up on my mantel.

Stop over at DIY Your Way to check out my tutorial on how to make your very own DIY Mantel Words.

Wednesday, January 16, 2013

Have an Indoor Snowball Fight!


Earlier this month, I mentioned that we were going to make a Family Fun To-Do list each month. One of the things on our list this month is to have an indoor snowball fight!

A couple of years ago, my sister Jamie showed me how to make these "snowballs." At the time, we were living on California central coast where it almost never snows. So, a fight with these little fiberfilled balls was just about the only kind we got to have. L and E just love it when we break these out!

If you want to make your own set, stop over at Life as MOM today! I'm sharing an easy tutorial on how to make these indoor snowballs. It's a perfect way to have a little indoor fun with your kiddies.

Wednesday, December 12, 2012

Homemade Christmas Craft and Gift Ideas

Hey folks! Things have been a little nuts around here, and alas, I didn't get around to writing a Make-It Monday post this week. I've actually been so busy creating crafts for Christmas Your Way and homemade gifts for DIY on a Dime over at Life as MOM that I've let things slide a bit here. Sorry!

But, I'm not completely empty handed! I thought I'd share a few things today that I've created for other blogs!

ABC Memory Game at Life as MOM

This month, Jessica at Life as MOM is posting a series of easy, handmade gifts that are perfect for Christmas. Last week, I contributed a Playdough Kit last week, and today I'm sharing my homemade ABC Memory Game. I'm actually planning on giving the game to Lu as a gift for Christmas. True, she's already seen it, but maybe if I hide it away for a couple of weeks she'll forget about it! Who knows? Maybe the girls will even get the playdough kits too. They loved those as well.

Playdough Kit at Life as MOM

All of the DIY on A Dime ideas are great. To make it easy to find them, Jessica has made a fantastic list of all the DIY on a Dime projects.


Christmas Tree Tags at Christmas Your Way

I have to confess, I've been so busy crafting that we haven't completely decorated out tree yet! Brett is busy studying for finals and I've been busy holding down the fort. I did manage to put the lights on the tree AND put up some of these little tree tag ornaments that I designed as part of the 101 Days of Christmas series at Christmas Your Way.

Well, I'm not done crafting yet. I've got a few more crafts up my sleeve. I'll post about them soon!

Wednesday, December 05, 2012

Felt Decorations for Your Holiday Beverages!

It's time for holiday parties and family get-togethers! Wednesday night, I got together with my friend Caroline to do a little crafting with felt. She's having a many, many houseguests this month as well as a Christmas celebration at her home. So, she wanted to make some simple decorations for beverages during the holidays. We had a great time, and my girls even joined in. Here's what we made:


So, what exactly are these?

Beverage Identifiers Made from Felt!!!!
These little babies can help folks identify their beverage (or empty glass) from everyone else's. This is great during a party OR even if you just have a home full of houseguests and don't want to wash every single glass each time it is used.

Originally, I designed these fun felt cup identifiers to go on regular beverage glasses. But, when I was playing around with them, I realized that they would work well on mugs...


 AND wine glasses as well!


Rather than stretching the elastic band around the cup itself, just loop the identifier around the handle of the mug or the stem of a wineglass. However, if you want your identifiers to fit on any style of glass, make sure that your decoration can be turned in any direction and still look right. Otherwise, you might have a sideways reindeer!


If you plan on using the identifiers primarily for wine AND you have a decoration that needs to be in a particular direction, then position your elastic band so that it is vertical rather than horizontal. For instructions on how to create these, stop by DIY Your Way and check out my felt cup identifier tutorial!

But that's not all that I made...check this out:


After Caroline left, I couldn't stop crafting. I decided to make a little decor for wine or other bottled drinks. With a strip of felt, you can make a fast, frugal, and fun little "scarf" for the bottled beverage of your choice.

How to Make a Wine Bottle Scarf:

Supplies:
  • felt
  • scissors
  • hot glue
  • other embellishments (optional)

Directions:
Cut a strip of felt to your desired length. Since I wanted to tie my scarf "european style," I needed a longer length. So, I used a 20-inch by 1-inch strip of felt. (Felt can be purchased off the bolt at a fabric store if you want a longer length. Otherwise, you can purchase a 9" x 12" sheets at the craft store for about $0.30 per sheet.)

Embellish the scarf however you wish. I glued smaller strips to the ends to create "fringe" for my scarf. You could also glue on sequins or rhinestones for a bit of bling.

When the scarf is done, tie it around the neck of your bottle. If you want to tie it European-style, fold the scarf in half with the ends together. Wrap the folded scarf around the neck of the bottle and pull the ends through the loop. Ta da!

------------------------
For other holiday craft ideas, be sure to stop by the Holiday Home Linky Party featuring Crafts at Centsational Girl on Thursday!

Friday, November 30, 2012

Gift Ideas under $12 for Little Chefs

While both of my girls enjoy cooking in the kitchen, Lucie REALLY enjoys it these days. I call her my little sous-chef. She's even started watching kitchen shows on TV for fun. Who knows if this is a life-long interest or a passing fad. But, I'm trying to embrace it now and enjoy moments in the kitchen with her.

Perhaps you've got a child (or niece, or nephew, or friend) who likes to cook too and for whom you'll be getting a Christmas gift. Here are a few inexpensive gift ideas for little chefs:


Make a Reversible Apron! Choose fabrics that your little chef will enjoy. I shared this reversible apron tutorial earlier this week.


Make a Love Spice Shaker Jar! Let your little one add that special ingredient at the end. This gift is practically free. Just reuse an old spice jar and embellish it with whatever you have on hand. I used scrapbook paper and Modge Podge. Instructions are available on Life as MOM.

Buy a child-friendly cookbook. Here are a few suggestions that are under $12:
  • Food, Faith, and Fun: A Faithgirlz! Cookbook: I bought this for Lucie (sshhhhh...don't tell!). She saw it at the school's book fair and really, really wanted it. I'm not sure if I'll give it to her for Christmas or for her birthday since that comes right after Christmas. But, I know that she'll love it! It includes recipes for many different holidays as well. The "cornucopia" recipe for Thanksgiving was amazingly adorable!
  • Once Upon a Time in the Kitchen: The librarian at E's school showed this to me. It looks soooo great. It has excerpts from classic children's stories and recipes that you can make together that are an extension of the story. It would be a great way to combine a storytime at home and a cooking lesson!
  • Cook It in a Cup: Quick Meals and Treats Kids Can Cook in Silicone Cups: This cookbook comes with a set of silicone baking cups to use to create the dishes in the cookbook. So fun!
What would you give to the little chef in your life?

-----------------------
For other money-saving ideas, stop by Frugal Friday at Life as MOM.

Monday, November 26, 2012

Make-It Monday: Child's Reversible Apron

Since 2010, I've featured "Make It Monday" on my blog during the holiday season. On the Mondays between Thanksgiving and Christmas, I share different ideas and instructions on how to make homemade (or partially homemade) gifts. My life is crazy right now, but I'm going to do my best to keep up the tradition. Stop by each week for a new homemade gift idea!


Today, I'm going to show you how to make an easy reversible apron for a child. I've got quite a dedicated little sous-chef here at my house. She loves using this little apron...and she looks pretty darn cute in it too. This is an inexpensive gift and a great way to use up small amounts of fabric that you might have around the house.

How to Make a Child's Reversible Apron

Supplies:
  • measuring tape
  • tissue paper to make pattern
  • pencil
  • two different fabrics (I used one print, one solid)
  • scissors
  • straight pins
  • thread
  • sewing machine
  • masking tape
  • safety pin
  • ribbon or double-wide bias tape (stitched closed)

Directions:

Make the Pattern:
To make your pattern, you'll need the child's measurements -- the width across the front of the chest, the length of the top of the apron to the armpit, and the length you want the apron to be, and the width of the apron (usually the width of the front of the child plus a couple of inches).

Cut a rectangle out a piece of tissue paper that is as long as you want the apron to be and as wide as you want the apron to be. My rectangle started out as 18 x 15. Fold in half lengthwise so you get a skinny rectangle (18 x 7.5). Take half of measurement for the top of the apron and mark that along the top of the tissue paper from the fold. On the open side of the tissue paper, mark the measurement for the distance from the top of the apron to the armpit. Draw a line from the mark at the top of the apron to the armpit mark. Cut along the line. Unfold and you should have a shape that looks like this:


Make the Apron:

Trace your pattern onto two different fabrics and cut them out. I chose one printed fabric and one solid covered fabric.

Place the cut-out pieces with the right sides together, and pin along the edges. Mark the places where you'll want to leave an opening for the apron tie -- near the edges of the top of the apron and at the bottom of the arpmit side edge. I used masking tape to mark these places so I wouldn't sew over them.

Leaving an opening at the bottom and where your tape is marked, sew along all of the edges, skipping over the areas where the tape is. It should look something like this:


Remove tape and turn right side out. Iron flat. Place the tape on the same openings along the top and sides of apron. Topstitch along the edges of the apron, closing the bottom of the apron and leaving the tape-marked spots open.

Stitch a seam parallel to the armpit side edges of the apron to create a casing for the apron strings, like this:


Remove tape. Pin a safety pin to one end of whatever you're using for your apron strings -- ribbon will work. (I used double-wide bias tape that I stitched closed.) Use the safety pin to help you thread the apron string through the bottom side opening, through the casing, and out the top. Then, loop the string down through the casing on the other side. The apron string can be adjusted to fit over the child's head. You can add a knot in the string at the bottom of the casing to help prevent the string from pulling all the way into the casing.

Other Sewing Projects that Make Great Gifts

Friday, November 23, 2012

Decorate for Christmas with DIY Rolled Paper Flowers!


Now that Thanksgiving has passed, I can officially decorate for Christmas!

Have you ever stopped by Christmas Your Way (a channel of Life Your Way)? Oh my, it is a wonderful resource for all things Christmas! Right now, they're about 2/3 of the way through a series called 101 Days of Christmas. There are tons of ideas for Christmas crafts, gifts, traditions, and food. Oh, it is so much fun to browse there!

Earlier this week, I shared a DIY Rolled Paper Flower Arrangement tutorial at Christmas Your Way. I just love how these flowers turned out. They were so cheap to make. I can see myself making different ones year round to suit the season. It would even be fun to make some out of book pages (for the book lover) or sheet music (for the musician). If you like crafts, stop by Christmas Your Way and check it out!

Tuesday, November 20, 2012

DIY Gingerbread House Tissue Box


I have to say, I'm pretty proud of this holiday craft tutorial that I'm sharing today over at Life as MOM -- a DIY Gingerbread House Tissue Box with downloadable template. It turned out so cute!

I built the structure on my own, but L helped me decorate our Gingerbread House. She loved deciding what should go where. It's a fun way to decorate in a useful way. The house camouflages a tissue box and the tissues come out of the chimney. Stop by Life as MOM today and learn how to make your own!

Monday, November 12, 2012

Thanksgiving Fun for Kids


I was looking at a calendar last night and realized how close Thanksgiving is -- only 9 days away! Wow, I've got lots to do! First off, I need to make a coffee date with my sister-in-law Aimee to plan out our meal. But, I'm also thinking about the other fun things that we can incorporate into this very special family day. I have a feeling that Aimee and I will be pretty busy with the cooking, so I'd love to have some father-supervision-friendly activities for the kids to do before we enjoy our feast.

Here are a few things that just might be happening at our Thanksgiving:

Do you plan any fun things for your kids to do on Thanksgiving?

Tuesday, October 23, 2012

A Simple Little Gift


This past weekend, we were invited to a new neighbor's house to celebrate their daughter's birthday. L and this sweet little girl have become buddies. It's soooo nice for L to have a friend her own age in the neighborhood!

We're living on a law school budget these days so gifts have to be of the inexpensive variety. Although our neighbor said that we didn't need to bring a gift, we wanted to bring a little something anyway. So, I whipped up a sweet little hairclip for our new friend.

I just love hairclips! Being a momma of two girls, I love that I can just pull their hair back with a little clip, and it can add a bit of fancy to their outfits. Best of all, they are so easy, fun, and inexpensive to make on your own. Although I've made hairclips out of felt flowers, puckered satin, and even felt starfish, my favorite ones are from these satin & rhinestone flowers that I created for DIY Your Way. So far, I think these flowers are still my favorite of all of my DIY Your Way crafts. They just make me smile!

Monday, October 22, 2012

Season Your Meals with Love


Today at Life as MOM, I'm sharing a fun way to "season your meals with love." Stop by and check out my easy-peasy tutorial on how to make your own "Love Spice Shaker."

Wednesday, October 17, 2012

I'm Keeping Cozy in my Scarf with Pockets!


The heat and humidity has finally left Virginia, and most days we have a lovely chill in the air! It's time for this California girl to bust out the scarves! I am notoriously bad for remembering gloves when I head out into the cold, so I decided to do something about it. I made myself a fleece scarf with pockets!

You can make one too! Head over to DIY Your Way and check out my tutorial on how to make a fleece scarf with pockets!

Friday, October 12, 2012

Save Money by Customizing Your Own Jewelry

I am not a fashionista. Really, I'm rather a Plain Jane. When I first read Fancy Nancy, I totally identified with Nancy's mom -- hair in a ponytail, glasses, jeans, and a t-shirt. Yep, that pretty much describes how my style has been. Comfortable. Low maintenance.

However, I'm learning that even just a few accessories can make a simple jeans & t-shirt ensemble look much more put-together. Unfortunately, I just don't have the extra funds in my budget to splurge on things like jewelry...unless it is REALLY cheap.

On the rare occasion when I have time and think of it, I will browse the clearance section to see if I can find a cool necklace or pair of earring for a steal. My fashionista sister-in-law Aimee picked up a cool necklace from The Loft for me last year for under $5, so I know that deals are out there if you look for them.

The other day, I decided to pop into a new accessories store in town to see what they carried. Oh my, Charming Charlie is an affordable accessory wonderland! Their regular prices are great -- about $12-15 for a necklace and earring set and $10 for individual necklaces.

Always the bargain shopper, I decided to check out the clearance section. Yes, it was obvious why some of the things were in the clearance section. Case in point? A chain with a 5-inch rhinestoned lightning bolt on the end. (Funnily enough, L thought that was pretty cool. Then again, it was pink so of course she liked it!)

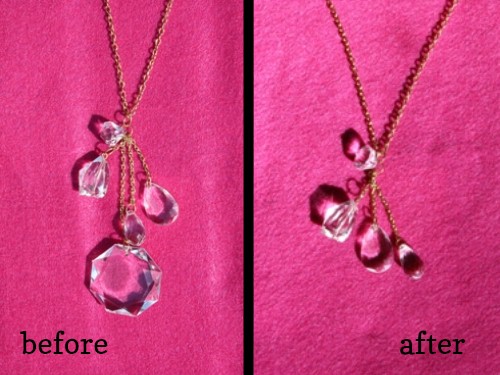
However, there were also some pieces that were cool but just a bit overdone for my tastes. The necklaces themselves were very pretty but had some dangling jewels at the bottom that were just too much. Personally, a "jewel" that is nearly two inches in diameter is just too big for me to wear on the end of a necklace. It made me feel like an 80s rapper or something.


But, the necklace was only $3, so I decided that I could make it work. With my round nose pliers, I was able to detach the ginormous "jewel" in mere seconds and create a necklace that I really like. Yeah!  Really, with some jewelry making tools, it's easy to customize a clearance necklace. You can shorten the length or remove any doodads that you just don't care for. I suppose you could even take different elements from multiple necklaces and create a unique piece too! The added bonus is that you can keep whatever you remove from the necklace and repurpose it in some other craft.

Do you have any budget-friendly fashion ideas?

-----------------------
For other money-saving ideas, be sure to stop by Frugal Friday every Friday at Life as MOM.

Friday, October 05, 2012

Decorate for Fall with a DIY Twig Mirror


Have you decorated for Fall? Well, of course, I meant to do so, but I got stymied on my mantle. I know I need something large to go over it, but I'm at a loss for what. I used to have a mirror there, but it really didn't do much for the room since it was frameless. Then my husband built a frame for it, but it didn't seem to go with the rest of the decor in the room. So, we've relocated the mirror, and I've got a blank mantle to work with. Thankfully, Lisa has some great step-by-step tips on how to decorate a mantle. I've got it on my to-do list...I'm just waiting for some inexpensive inspiration.

But just because I didn't get around to decorating my mantle doesn't mean that I haven't done any fall decorating. Just last week I made a fun mirror that is a great way to decorate for fall.  The finished size is about 12-inches in diameter -- just perfect for a Fall accent mirror. Best of all, this DIY Twig Mirror is so incredibly inexpensive to make - the main materials cost a mere $2! Wanna see how I did it? Head on over to DIY Your Way today for my step-by-step tutorial on how to make this sweet little twig mirror!

What inexpensive ideas do you have for Fall decorating?

--------------------------
For other money-saving ideas, be sure to check out Frugal Friday at Life as MOM.

Monday, September 24, 2012

Make A Fun Fall Frame!


L and E love to collect sticks as I think most children do. Whenever we go for a walk or to the park, we almost always come home with some extra sticks in tow. Did you know that sticks are a great and FREE craft supply?

Today, come join me over at Life as MOM where I'm sharing how to create a fun frame out of sticks for your fall photos or artwork! Your kids will LOVE this craft!

Monday, September 17, 2012

Dress Up Your Candles with Beads!


When the weather gets cooler and the sun sets earlier, I'm tempted to break out the candles. Recently, I picked up some Fall-scented candles at the Dollar Tree. It got me inspired to dress up some $1 candle holders as well as some jars to make something unique for my Fall Mantel. Come stop by DIY Your Way today for my beaded candle holder tutorial!